


6 Tips and Tricks for Your Next Drywall Project
Drywall installation and repair are critical aspects of building and remodeling homes. Whether you’re a DIY enthusiast or a professional, knowing a few key tips and tricks can make your next drywall project smoother, more efficient, and yield better results.
6 Tips and Tricks for Your Next Drywall Project
Here are six valuable insights to enhance your drywall work and you may check this site www.auroracodrywall.com.
1. Select the Right Drywall Thickness
Choosing the correct thickness of drywall is essential for both the aesthetics and functionality of your walls. For most interior walls, 1/2-inch drywall is standard. However, for ceilings or walls requiring extra soundproofing or insulation, thicker options like 5/8-inch drywall are advisable. Ensure you select the appropriate thickness for your specific application to ensure optimal performance and ease of installation.
2. Use a Drywall Lift for Ceilings
When installing drywall on ceilings, a drywall lift can be a game-changer. This tool supports the drywall panel while you secure it to the ceiling joists, reducing physical strain and the risk of the panel falling or breaking. It also allows for more precise placement, ensuring that your seams line up correctly.
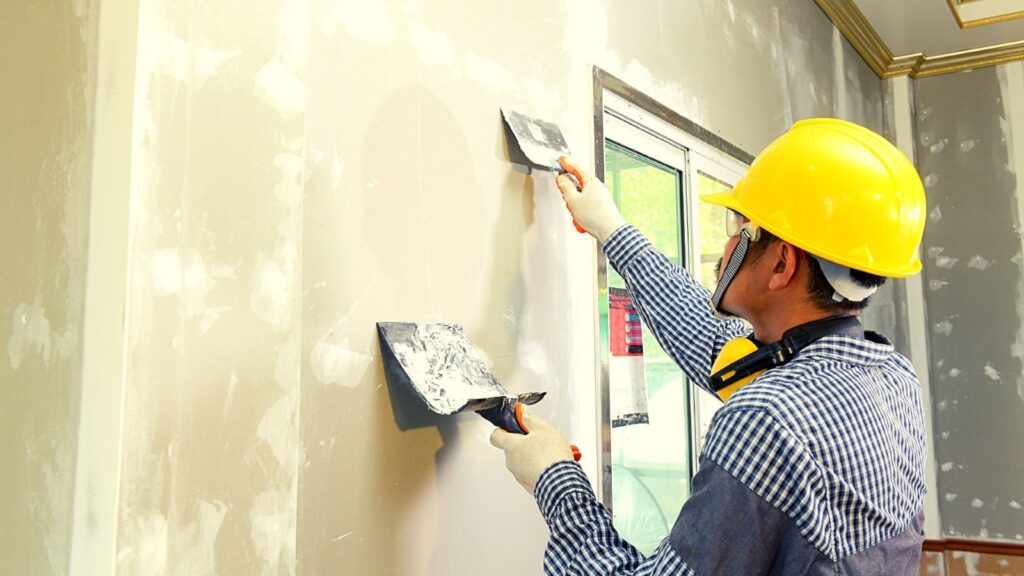
3. Apply a Skim Coat for a Smooth Finish
For a smooth, professional-looking finish, apply a skim coat over the entire wall or ceiling. This involves thinly spreading joint compound over the surface with a trowel or wide putty knife. This step can hide imperfections, create a uniform texture, and prepare the surface for painting. Allow the skim coat to dry thoroughly and then sand it smoothly before painting.
4. Use Paper Tape for Stronger Joints
While mesh tape is often used for drywall joints, paper tape provides greater strength and crack resistance, especially for joints that may experience some movement or stress. Apply a thin layer of joint compound to the seam, place the paper tape over it, and then smooth it out with a drywall knife. This will help prevent cracks and ensure a more durable finish.
5. Employ a ‘Feathering’ Technique When Sanding
When sanding joint compound, use a feathering technique to blend the compound seamlessly with the rest of the wall. This means lightly sanding the edges of the compound more than the center, creating a gradual transition that’s almost imperceptible. Remember to use fine-grit sandpaper and sand gently to avoid damaging the drywall.
6. Keep Your Workspace Clean and Organized
A clean and organized workspace is vital for efficient and high-quality drywall work. Regularly clean up dust and debris, keep your tools organized, and dispose of waste materials properly. This not only makes the job more pleasant but also reduces the risk of accidents and mistakes.
Conclusion: 6 Tips and Tricks for Your Next Drywall Project
Successful drywall projects require careful planning, the right tools and materials, and attention to detail. By selecting the correct drywall thickness, using a drywall lift for ceilings, applying a skim coat, choosing paper tape for joints, employing a feathering technique when sanding, and maintaining a clean workspace, you can achieve a professional and lasting finish. Whether you’re patching a small hole or installing drywall in a new room, these tips and tricks will help you complete your project with confidence and precision. Remember, taking your time and focusing on quality will always yield the best results in drywall work.
Factors That Affect the Cost of Cinder Block Wall Installation
When it comes to constructing a sturdy and durable wall, cinder blocks have long been a popular choice among homeowners.?

However, understanding the factors influencing the cost of cinder block wall installation is crucial for effective budgeting and project planning. By gaining insight into these factors, you can make informed decisions.?
Here are some of the key elements that can impact the overall costs of installing a?cinder block wall.?
Cost of Materials
The cost of materials is a primary factor influencing the overall cinder block wall installation cost. The type and quality of cinder blocks, mortar, and reinforcing materials significantly impact the project’s budget.?
Higher-quality cinder or specialty blocks designed for specific purposes may come at a higher price point. Additionally, the quantity of materials required, determined by the size and height of the wall, will also affect the overall cost.?
It’s essential to consider the cost of materials and choose options that balance quality and affordability.
Cinder Blocks vs. Concrete Blocks
Cinder blocks are generally less expensive compared to concrete blocks. This price difference is due to the composition of the blocks. For those who don’t know, cinder blocks are made from a mixture of Portland cement, aggregate, and coal cinders, while concrete blocks are composed of cement, aggregate, and sand.?
Concrete blocks tend to offer higher strength and durability. Thus, they are suitable for load-bearing walls or areas with higher structural requirements. However, if your project doesn’t demand the added strength of concrete blocks, opting for cinder blocks can help reduce costs without compromising on the overall functionality of the wall.?
Labor?
Labor is a significant factor that affects the cost of cinder block wall installation. Skilled labor is required for proper cinder block wall construction, including tasks such as excavation, leveling, mortar mixing, block laying, and finishing.?
The more intricate the design or, the higher the wall’s height, the more time and expertise are needed, potentially increasing labor costs.?
Moreover, the project’s location can influence labor rates, as areas with higher living costs typically have higher labor charges. You should obtain multiple quotes from reputable contractors and factor in the labor costs when estimating the total expense of your cinder block wall installation project.
Permits
Depending on your location and local building codes, you may be required to obtain permits before starting the construction process. Permit fees vary by jurisdiction and are typically based on the scope and value of the project. These fees contribute to the overall cost of the installation.?
Additionally, acquiring permits often involves submitting detailed plans and undergoing inspections, which may require professional assistance or consultation fees. While permit costs may add to the initial expenses, it is crucial to comply with local regulations to ensure the safety and legality of the project.?
Ignoring permits can result in penalties, fines, or even having to dismantle and redo the construction. It’s recommended to research and budget for the necessary permits to avoid unexpected costs and legal complications during your cinder block wall installation.
Things to Avoid During Home Renovation
Embarking on a home renovation project is an exciting endeavor that allows you to transform your living space according to your vision. However, it’s crucial to approach renovations cautiously and avoid common pitfalls that can turn your dream into a nightmare. Lucky for you, we are here to help.

Today, we’ll explore the key things to avoid during a home renovation. By being aware of these potential pitfalls, you can ensure a smoother, more successful renovation experience, whether a simple?drywall installation?or a complicated bathroom remodel.?
Ignoring Permits
Ignoring permits during a home renovation may seem tempting, as it can save you time and money in the short term. However, it’s a decision that can lead to severe consequences.?
Note that permits exist for a reason: to ensure that renovations meet safety codes, building regulations, and zoning requirements. By bypassing permits, you risk compromising the structural integrity of your home, facing legal consequences, and even encountering difficulties when selling your property in the future.?
Measuring Once
When it comes to home renovation, measuring once is simply not enough. Accurate measurements ensure that materials fit properly, installations are precise, and the overall project comes together seamlessly.?
Failing to measure multiple times can result in costly mistakes, wasted materials, and delays in the renovation process.?
Remember, precision is vital to achieving professional-looking results and maximizing the efficiency of your renovation efforts. So, make it a habit to measure not just once but multiple times throughout the project to save yourself from unnecessary headaches and setbacks.
Leaving Exposed Wires
Exposed wires pose a significant risk of electrical shock and can potentially lead to fires, causing harm to you, your family, and your property. It’s crucial to prioritize electrical safety by properly securing and concealing all wires within designated conduits or behind walls.?
Hiring a licensed electrician to handle any electrical work ensures that the wiring is done correctly and up to code. Don’t compromise on safety—keep those wires properly concealed throughout your renovation journey.
Leaving Your Old Floor
Leaving your old floor in place during a renovation may seem convenient and cost-saving, but it has drawbacks.?
There are several reasons why it’s generally advisable to remove the old floor before proceeding with renovations. Firstly, it allows for a fresh start, ensuring that any underlying issues, such as damaged subfloors or uneven surfaces, can be addressed and corrected.?
Removing the old floor lets you update the flooring material, style, or layout to better suit your design preferences.?
Additionally, removing the old floor allows for the proper installation of new flooring, ensuring longevity, durability, and optimal performance.?
Lastly, it helps eliminate potential problems like moisture or mold issues that may be present beneath the old floor.?
Conclusion
By avoiding common pitfalls such as ignoring permits, measuring once, leaving wires exposed, and leaving the old floor in place, you can set yourself up for a smoother and more successful home renovation.?
Prioritize safety, precision, and thoroughness throughout the process to protect your investment, achieve quality results, and create a space you’ll love. Happy renovating!
Signs You Need to Fix Your Drywall
When it comes to your home’s structural integrity and aesthetics, the condition of your drywall plays a crucial role. However, wear and tear can take a toll on this essential element over time. Whenever this happens, it can lead to various issues.?

As a homeowner, you want to fix these issues as soon as possible. However, how will you know if your drywall requires repair??
In this article, we will explore the undeniable signs that indicate your drywall needs repair. If you notice at least one of these signs, don’t hesitate to call?drywall contractors.
Water Damage
Water intrusion can wreak havoc on your drywall, whether caused by leaky pipes, roof leaks, or plumbing issues. The visible stains, discoloration, and swelling are unsightly. They also indicate deeper underlying issues.?
Ignoring water damage can lead to mold growth, compromised structural integrity, and even potential health hazards. Timely repairs will save you from more extensive and costly renovations.
Cracks
Cracks in drywall aren’t just cosmetic blemishes. They can indicate underlying structural issues that require immediate attention. Whether they are hairline cracks or more substantial fissures, these imperfections can compromise the integrity of your walls.?
Ignoring cracks may result in more extensive damage and even pose safety risks. Repairing these cracks not only restores the visual appeal of your walls but also ensures their strength and durability, safeguarding your living or working environment.?
Holes
Drywall repair is necessary when there are holes because it helps maintain a wall’s structural integrity and aesthetic appeal. Holes in drywall can occur due to various reasons, such as accidents, furniture movement, or installation of fixtures.?
Fixing these holes involves patching them with joint compound or spackle, smoothing the surface, and then sanding it to create a seamless finish.?
Repairing drywall prevents further damage, such as moisture intrusion or pests, and ensures a solid surface for painting or wallpapering. It also helps maintain a consistent appearance throughout the room.?
Popping Nails
Fixing drywall when you see popping nails is crucial to maintain the structural integrity and appearance of the wall. Popping nails occur when the fasteners securing the drywall to the studs become loose, causing the nails to protrude from the surface. This creates an unsightly blemish and poses a risk of further damage and instability.?
Repairing the popping nails involves:
- Removing them.
- Securing the drywall with new nails or screws.
- Patching and finishing the affected area.?
By addressing popping nails promptly, you prevent further deterioration, ensure a smooth and even wall surface, and maintain the overall strength and aesthetics of the wall.
Tears
Tears in drywall can occur due to accidents, impacts, or general wear and tear. Ignoring tears can lead to further damage, such as moisture seepage or the expansion of the affected area.?
Fixing the tears involves patching them with joint compound or drywall tape, smoothing the surface, and then applying paint or texture to match the surrounding area. By addressing tears promptly, you prevent the risk of more significant structural issues and maintain a visually pleasing and seamless wall surface.?
Properly repaired drywall ensures the longevity and value of the overall space.
Recent Comments